Publish a live stream from an IP camera to Wowza Streaming Engine™ media server software for playback on a wide variety of players.
Video tutorial: Send video from an IP camera to Wowza Streaming Engine
See how to use an IP camera to stream to Wowza Streaming Engine.
Before you start
You should complete the following tasks:
- Create a live application according to Create applications.
1. Configure playback
Before connecting a live source and publishing a live stream, complete the following steps to configure playback support for your application.
- Click the Applications tab at the top of the page and then select your application in the contents panel.
- Click the Setup tab on your application's page and then click Edit.
- Under Playback Types, select any streaming protocols you need to support for playing streams sent to this application. The playback types enable transmuxing a source stream into MPEG-DASH, HLS, RTMP, and RTSP/RTP.
- Click Save.
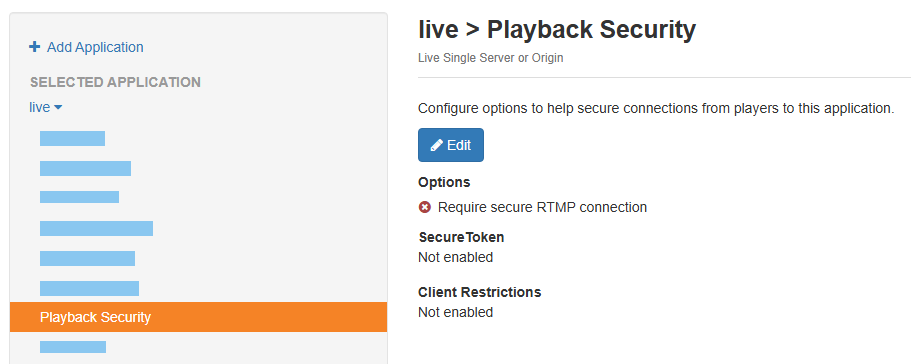
- In the application's contents panel, click Playback Security, and then click Edit. For more information about Playback Security options, see Playback security options.
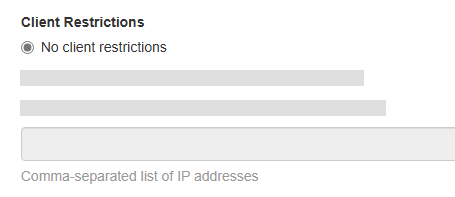
- Under Client restrictions, select No client restrictions to allow players to connect from any IP address.
- Click Save and then restart the application.
2. Connect to a source stream
Now create a .stream file to publish your live stream to Wowza Streaming Engine.
- Consult your camera's documentation to configure an outgoing live stream.
- Create the .stream file:
- In the Server contents panel, click Stream Files, and then click Add Stream File.
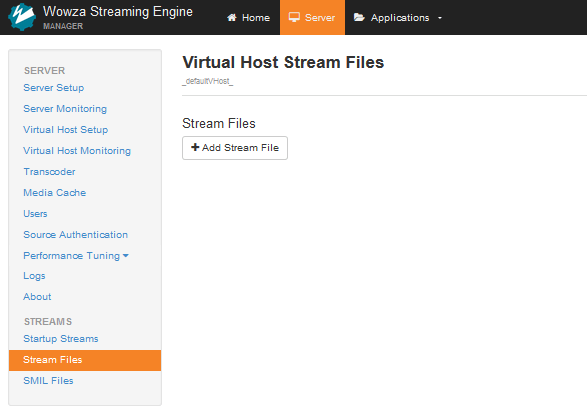
Note: You can also start the procedure to create a .stream file in the Applications contents panel for the application.
-
In the Add Stream File dialog box, enter a name for the new stream file, enter Stream URI, and then click Add.
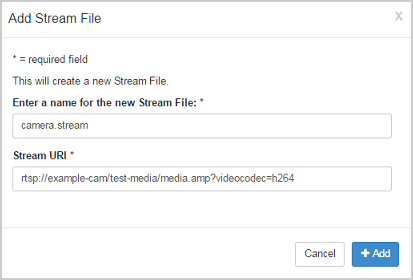
IP camera manufacturers use proprietary URL syntax. Consult your camera documentation for the URL syntax of the stream and enter this value in Stream URI.
- In the Server contents panel, click Stream Files, and then click Add Stream File.
- Start the stream:
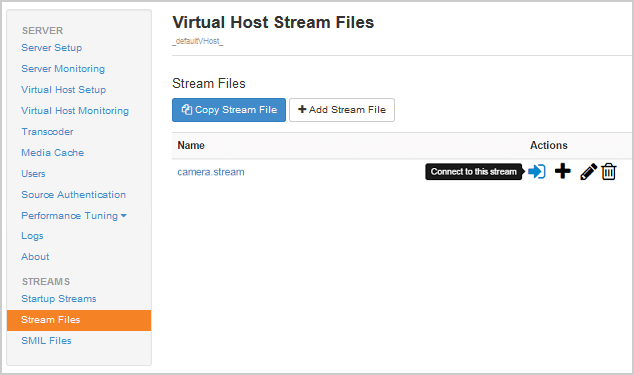
- In the Server contents panel, click Stream Files, and then click the Connect icon for the stream file you created in step 2.
-
In the Connect a Stream File dialog box, select your application in Application Name and rtp in MediaCaster Type, and then click OK.
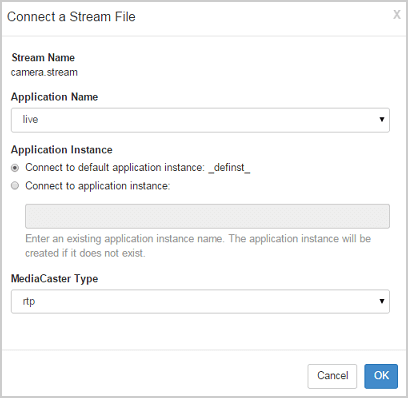
Note: Use the rtp-record MediaCaster type for re-streaming while simultaneously recording the stream to a single file in the application's streaming file directory. For more information, see About recording MediaCaster streams.
- In the Server contents panel, click Stream Files, and then click the Connect icon for the stream file you created in step 2.
A message appears indicating the connection is successful.

3. Verify the connection
To verify that Wowza Streaming Engine is receiving the published stream, complete the following steps in Wowza Streaming Engine Manager.
- Click Incoming Streams in the contents panel for your live application. You should see your stream listed with Active for the status.
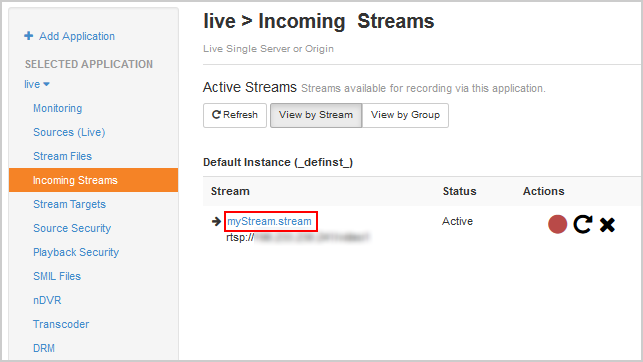
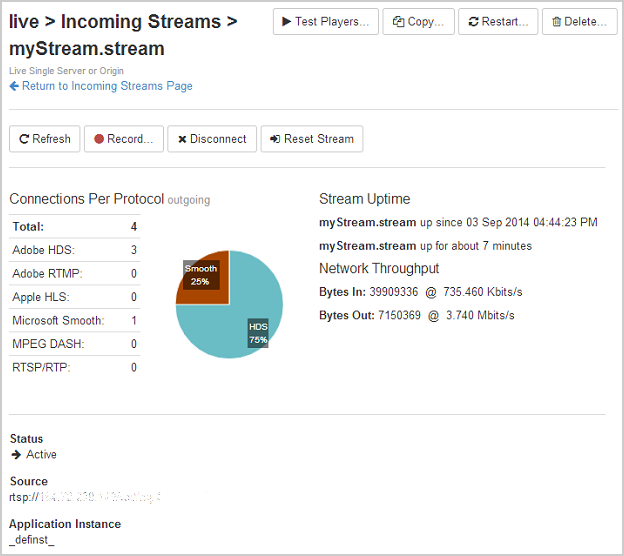
- Click the stream name to see the uptime, network throughput, and other information about the published stream.
4. Test playback
- In Wowza Streaming Engine Manager, in the contents panel for your application, click Stream Files.
- In the Stream Files list, click the name of your stream file.
- From your stream file's page, click Test Playback.
- Review and, if needed, edit the following information in the Test Playback window for your stream:
- Server – The IP address or domain name of the server and the streaming port ([address]:[port]).
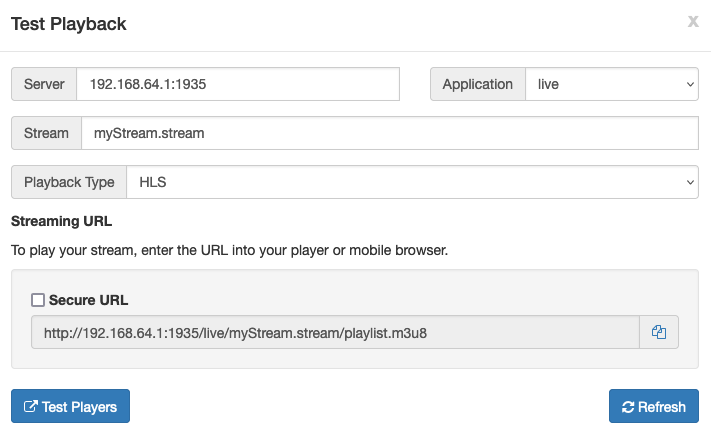
Note: The stream name should include the .stream file extension.
- (Optional) In the Streaming URLs section, select Secure URL for the streaming protocol you want to use to test playback if you have configured SSL/TLS for streaming over https, rtmps, or rtsps.
- Click the Copy icon for the streaming protocol you want to use to test playback.
- Paste the playback URL into your player or a mobile browser depending on the protocol. Alternatively, you can use the Wowza Video Test Players webpage. For more information about playback URLs, see About playing Wowza Streaming Engine streams.
Next steps
Troubleshooting
Check your IP camera source
First, make sure your camera can send H.264, H.265, AAC, or MP3 content. You can do this by using the VideoLAN VLC player.
- Open the VLC player.
- On the Media menu, click Open Network Stream, enter your camera's RTSP URL, and then click Play.
- After the stream starts playing, on the Tools menu, click Codec Information, and make sure that one or two of the following codecs are listed:
- H.264 or AVC1 or MPEG4 Part10
- H.265 or HEVC
- AAC
- MP3
- H.264 or AVC1 or MPEG4 Part10
If your camera doesn't support the proper formats, the stream must be transcoded before it's sent to Wowza Streaming Engine.
Change the RTP transport mode
If your camera doesn't support RTSP/RTP interleaved (RTP over TCP), change the RTPTransportMode property from interleave to udp.
Note: The MediaCaster RTPTransportMode property applies to all streams delivered by the application. For information on changing RTSP properties for a single stream, see RTSP stream settings.
To change RTP transport mode for an application, open the Application.xml file for your live application ([install-dir]/conf/[application]) and change the RTPTransportMode property to udp as follows:
<MediaCaster>
   <RTP>
      <RTSP>
         <!-- udp, interleave -->
         <RTPTransportMode>udp</RTPTransportMode>
      </RTSP>
   </RTP>
   ...
</MediaCaster>
Then, restart Wowza Streaming Engine to apply the changes.
Turn off RTSP validation
Some IP cameras may fail when Wowza Streaming Engine tries to periodically validate the RTSP/RTP connection. The camera will disconnect and reconnect every 15 to 30 seconds. You can turn off RTSP/RTP validation by adding the rtspValidationFrequency property to your application.
Note: The MediaCaster rtspValidationFrequency property applies to all streams delivered by the application. For information on changing RTSP properties for a single stream, see RTSP stream settings.
- Click the Applications tab and then click the name of your live application in the contents panel.
- On the Properties tab of the live application page, click Custom in the Quick Links bar.
- In the Custom area, click Edit.
- Click Add Custom Property, specify the following settings in the Add Custom Property dialog box, and then click Add:
- Path - Select /Root/Application/MediaCaster
- Name - Enter rtspValidationFrequency
- Type - Select Integer
- Value - Enter 0 (ms). Specifying 0 turns validation off.
- Path - Select /Root/Application/MediaCaster
- Click Save, and then restart the application to apply the changes.
The property is added to the application's Application.xml file within the <MediaCaster>/<Properties> container element as in the following example:
<Property>
   <Name>rtspValidationFrequency</Name>
   <Value>0</Value>
   <Type>Integer</Type>
</Property>
Filter unknown tracks
Some IP cameras send additional application tracks that Wowza Streaming Engine can't understand. You can filter these tracks by adding the rtspFilterUnknownTracks property.
Note: The MediaCaster rtspFilterUnknownTracks property applies to all streams delivered by the application. For information on changing RTSP properties for a single stream, see RTSP stream settings.
- Click the Applications tab and then click the name of your live application in the contents panel.
- On the Properties tab of the live application page, click Custom in the Quick Links bar.
- In the Custom area, click Edit.
- Click Add Custom Property, specify the following settings in the Add Custom Property dialog box, and then click Add:
- Path - Select /Root/Application/MediaCaster
- Name - Enter rtspFilterUnknownTracks
- Type - Select Boolean
- Value - Enter true
- Path - Select /Root/Application/MediaCaster
- Click Save, and then restart the application to apply the changes.
The property is added to the application's Application.xml file within the <MediaCaster>/<Properties> container element as in the following example:
<Property>
   <Name>rtspFilterUnknownTracks</Name>
   <Value>true</Value>
   <Type>Boolean</Type>
</Property>
Turn audio or video tracks off
You can turn off audio or video tracks by adding the rtspStreamAudioTrack and rtspStreamVideoTrack custom properties.
Notes: These MediaCaster properties apply to all streams delivered by the application. For information on changing RTSP properties for a single stream, see RTSP stream settings.
- Click the Applications tab and then click the name of your live application in the contents panel.
- On the Properties tab of the live application page, click Custom in the Quick Links bar.
- In the Custom area, click Edit.
- Click Add Custom Property, specify the following settings in the Add Custom Property dialog box, and then click Add:
- Path - Select /Root/Application/MediaCaster
- Name - Enter rtspStreamAudioTrack
- Type - Select Boolean
- Value - Enter false
- Path - Select /Root/Application/MediaCaster
- Repeat Step 4 to add the rtspStreamVideoTrack property using the following values:
- Path - Select /Root/Application/MediaCaster
- Name - Enter rtspStreamVideoTrack
- Type - Select Boolean
- Value - Enter false
- Path - Select /Root/Application/MediaCaster
- Click Save, and then restart the application to apply the changes.
The properties are added to the application's Application.xml file within the <MediaCaster>/<Properties> container element as in the following example:
<Property>
   <Name>rtspStreamAudioTrack</Name>
   <Value>false</Value>
   <Type>Boolean</Type>
</Property>
<Property>
   <Name>rtspStreamVideoTrack</Name>
   <Value>false</Value>
   <Type>Boolean</Type>
</Property>
Find missing audio or video
To determine if audio or video is missing from the IP camera source, check Wowza Streaming Engine logs for either of the following warning statements:
RTPSessionDescriptionDataProviderBasicRTSPWorker.buildSDPData: SDP data missing rtpmap entry for [audio] track. Try adding MediaCaster/Property rtspDefaultAudioRTPMap with track media information.
RTPSessionDescriptionDataProviderBasicRTSPWorker.buildSDPData: SDP data missing rtpmap entry for [video] track. Try adding MediaCaster/Property rtspDefaultVideoRTPMap with track media information.
If either or both statements are present, add the missing track or tracks.
Add missing tracks in Wowza Streaming Engine Manager
- Click the Applications tab and then click the name of your live application in the contents panel.
- On the Properties tab of the live application page, click Custom in the Quick Links bar.
- In the Custom area, click Edit.
- Click Add Custom Property, specify the following settings in the Add Custom Property dialog box, and then click Add:
- Path - Select /Root/Application/MediaCaster
- Name - Enter rtspDefaultAudioRTPMap
- Type - Select String
- Value - Enter PCMU/8000
- Path - Select /Root/Application/MediaCaster
- Click Save, and then restart the application to apply the changes.
The property is added to the application's Application.xml file within the <MediaCaster>/<Properties> container element as in the following example:
<Property>
   <Name>rtspDefaultAudioRTPMap</Name>
   <Value>PCMU/8000</Value>
   <Type>String</Type>
</Property>
Check the RTSP KeepAlive property
Some IP cameras require a keepalive to be sent as the GET_PARAMETER to keep the connection open. This can be sent by adding the rtspKeepAliveCommand property.- Click the Applications tab and then click the name of your live application in the contents panel.
- On the Properties tab of the live application page, click Custom in the Quick Links bar.
- In the Custom area, click Edit.
- Click Add Custom Property, specify the following settings in the Add Custom Property dialog box, and then click Add:
- Path - Select /Root/Application/MediaCaster
- Name - Enter rtspKeepAliveCommand
- Type - Select String
- Value - Enter GET_PARAMETER
- Path - Select /Root/Application/MediaCaster
- Click Save, and then restart the application to apply the changes.
The property is added to the application's Application.xml file within the <MediaCaster>/<Properties> container element as in the following example:
<Property>
   <Name>rtspKeepAliveCommand</Name>
   <Value>GET_PARAMETER</Value>
   <Type>String</Type>
</Property>


