The Transcoder in Wowza Streaming Engine™ media server software supports accelerated video transcoding with an AMD Xilinx Alveo U30 data center accelerator card. For more information, see:
- Introduction to AMD Xilinx acceleration with Wowza Streaming Engine transcoding flow
- Server specifications for AMD Xilinx acceleration with Wowza Streaming Engine transcoding
- Limitations of AMD Xilinx acceleration with Wowza Streaming Engine transcoding
This article describes setting up the AMD Xilinx Video SDK and Wowza Streaming Engine on Ubuntu Server. These steps were tested against Ubuntu Server 22.04 with the 5.15.0 kernel.
Before you start
This guide assumes you're installing the video solution on a server running Ubuntu Server 22.04 and kernel 5.15.0, with one or more Alveo U30 data center accelerator cards installed per these instructions.
Install AMD Xilinx Video SDK 3.0
- Remove older versions of the Xilinx Video SDK packages in case they were previously installed.
sudo apt-get remove xvbm xilinx-u30-xvbm xrmu30decoder xrmu30scaler xrmu30encoder xmpsoccodecs xmultiscaler xlookahead xmaapps xmapropstojson xffmpeg launcher jobslotreservation xcdr
sudo apt-get remove xrm xilinx-container-runtime xilinx-xvbm xilinx-u30-xrm-decoder xilinx-u30-xrm-encoder xilinx-u30-xrm-multiscaler xilinx-u30-xma-multiscaler xilinx-u30-xlookahead xilinx-u30-xmpsoccodecs xilinx-u30-xma-apps xilinx-u30-xmapropstojson xilinx-u30-xffmpeg xilinx-u30-launcher xilinx-u30-jobslotreservation xilinx-u30-xcdr xilinx-u30-gstreamer-1.16.2 xilinx-u30-vvas xilinx-sc-fw-u30 xilinx-u30-gen3x4-base xilinx-u30-gen3x4-validate
- Add the following line to the /etc/apt/sources.list file. This ensures your package management client points to the remote package repository for the Xilinx Video SDK.
deb [trusted=yes] https://packages.xilinx.com/artifactory/debian-packages <distro name>main
Note: For an Ubuntu 22.04 server as assumed in this article, you'd use focal for the <distro name>. See https://packages.xilinx.com/ui/native/debian-packages for other available distributions.
- Install various packages of the Xilinx Video SDK:
sudo apt-get update
sudo apt-get install xrt=2.11.722
sudo apt-get install xilinx-alveo-u30-core
sudo apt-get install xilinx-alveo-u30-ffmpeg
sudo apt-get install xilinx-alveo-u30-gstreamer
sudo apt-get install xilinx-alveo-u30-examples
- Set up the bitstreams for the U30 devices:
sudo cp /opt/xilinx/xcdr/xclbins/transcode.xclbin /opt/xilinx/xcdr/xclbins/transcode_lite.xclbin
sudo cp /opt/xilinx/xcdr/xclbins/on_prem/transcode.xclbin /opt/xilinx/xcdr/xclbins/transcode.xclbin
- Program the binary images in the non-volatile flash memories of the devices on your Alveo U30 cards:
sudo /opt/xilinx/xrt/bin/xball --device-filter u30 xbmgmt program --base
Note: If any problems arise when running this command, revert the card to its golden image as explained in the card recovery instructions. Then repeat this step.
- Cold boot the machine to ensure the cards use the new binaries:
sudo shutdown now
- After the cold boot is complete, check that all cards are up to date:
source /opt/xilinx/xrt/setup.sh
sudo /opt/xilinx/xrt/bin/xball --device-filter u30 xbmgmt program --base
If all cards are up to date, the script reports this information and terminates. You can then proceed to the next step. Otherwise, you may see messages indicating Actions to perform: Program Satellite Controller (SC) image. The script will perform the required Satellite Controller updates. After all updates are complete, perform a warm reboot of the machine.
- Test the installation was successful:
source /opt/xilinx/xrt/setup.sh
sudo /opt/xilinx/xrm/tools/stop_xrmd.sh
xball --device-filter u30 xbutil validate
sudo /opt/xilinx/xrm/tools/restart_xrmd.sh
This script runs a validation test on each of the devices (two devices per card) in your system. For each test, you should see a Validated successfully [1 device(s)] message similar to this:
=========================================================
1 / 2 [0000:0f:00.1] : xilinx_u30_gen3x4_base_2
~~~~~~~~~~~~~~~~~~~~~~~~~~~~~~~~~~~~~~~~~~~~~~~~~~~~~~~~~
Command: /opt/xilinx/xrt/bin/xbutil validate --device 0000:0f:00.1

Starting validation for 1 devices
…
Validation Summary
------------------
1  device(s) evaluated
1  device(s) validated successfully
0  device(s) had exceptions during validation

Validated successfully [1 device(s)]
  - [0000:0f:00.1] : xilinx_u30_gen3x4_base_2
…

=========================================================
2 / 2 [0000:0e:00.1] : xilinx_u30_gen3x4_base_2
~~~~~~~~~~~~~~~~~~~~~~~~~~~~~~~~~~~~~~~~~~~~~~~~~~~~~~~~~
Command: /opt/xilinx/xrt/bin/xbutil validate --device 0000:0e:00.1

Starting validation for 1 devices
…
Validation Summary
------------------
1  device(s) evaluated
1  device(s) validated successfully
0  device(s) had exceptions during validation

Validated successfully [1 device(s)]
  - [0000:0e:00.1] : xilinx_u30_gen3x4_base_2
…
~~~~~~~~~~~~~~~~~~~~~~~~~~~~~~~~~~~~~~~~~~~~~~~~~~~~~~~~~
Summary:
   Installed device(s) : 2
          Shell Filter : 'u30'
      Number Evaluated : 2
                Passed : 2
                Failed : 0
~~~~~~~~~~~~~~~~~~~~~~~~~~~~~~~~~~~~~~~~~~~~~~~~~~~~~~~~~
- This step only applies if you're running Wowza Streaming Engine 4.8.27, which changed the AMD xilinx-alveo-u30-core plugin to get the WebRTC transcoding feature with the U30 cards into production mode. If you're working with an older version of Wowza Streaming Engine, skip to step 10 instead.
- Download the custom Debian package to install the AMD xma_plugins fix for your distribution.
- Install the AMD xma-plugins fix for your distribution. Replace the XX.XX placeholder to match the Ubuntu version:
sudo dpkg -i xilinx-u30-xmpsoccodecs_1.2.0_XX.XX-amd64.deb
- Verify the installation is correct by running these commands:
md5sum /opt/xilinx/xma_plugins/libvcu-xma-dec-plg.so
md5sum /opt/xilinx/xma_plugins/libvcu-xma-enc-plg.so
- Check that the results are as follows:
Ubuntu 18.04
1c61ae730a6baa8fe497029ba1d786ef for libvcu-xma-dec-plg.so
59d221d1ae25346b3bdf9fcb6c517bbe for libvcu-xma-enc-plg.so
Ubuntu 20.04
3221568443a00afa9916dd5957f593de  for libvcu-xma-dec-plg.so
73dbe80a7d1c2bf5e2fc593bdd4944db  for libvcu-xma-enc-plg.so
Ubuntu 22.04
6400487884c8e1d71f39e9a35f978407  for libvcu-xma-dec-plg.so
49e4ceca981ad44331bf34234569b824  for libvcu-xma-enc-plg.so
- Reboot the instance:
sudo reboot
- Install Java and Wowza Streaming Engine. To learn more, refer to Install and configure Wowza Streaming Engine.
Note: For more information about the AMD Xilinx Alveo U30 card and Video SDK 3.0 installation, see Getting started with Alveo U30 on-premises.
Enable the transcoder load balancer
Next, enable the U30 transcoder load balancer. Go to the <Properties> section of the Server.xml file located in [install-dir-wse]/conf/Server.xml and add the following property:
<Property>
  <Name>transcoderVideoLoadBalancerClass</Name>
  <Value>com.wowza.wms.transcoder.model.TranscoderVideoLoadBalancerU30Simple</Value>
</Property>
You can now use the U30 transcoding implementation in your Transcoder template. For more information, see Set up and run Transcoder in Wowza Streaming Engine.
Confirm U30 card utilization
When you start a transcoding process using a template you configured for the U30 card, you may wish to confirm that the system uses U30 hardware resources, such as a decoder, scaler, and encoder. You can achieve this task with the xrmadm command.
- Start a transcoding process.
- Open a new bash shell and run this command:
/opt/xilinx/xrm/bin/xrmadm /opt/xilinx/xrm/test/list_cmd.json > load.txt
This command generates a JSON report with load details for all compute unit (CU) resources. Within the report, you can find sections for each system device. The device sections contain sub-sections with load information for each of the CUs in that device (decoder, scaler, lookahead, and encoder).
"device_0": {
    ...
    "cu_3": {
        "cuId         ": "3",
        "cuType       ": "IP Kernel",
        "kernelName   ": "decoder",
        "kernelAlias  ": "DECODER_MPSOC",
        "instanceName ": "decoder_1",
        "cuName       ": "decoder:decoder_1",
        "kernelPlugin ": "/opt/xilinx/xma_plugins/libvcu-xma-dec-plg.so",
        "maxCapacity  ": "497664000",
        "numChanInuse ": "1",
        "usedLoad     ": "500000 of 1000000",
        "reservedLoad ": "500000 of 1000000",
        "resrvUsedLoad": "500000 of 1000000"
    },
   …
The usedLoad value indicates how much of the resource is currently in use. This value ranges from 0 (nothing running) to 1000000 (fully loaded). In the previous example, the decoder is 50 percent utilized.
For more about the xrmadm command, see the Checking System Load chapter in the Xilinx card management documentation.
Recommendations for U30-based configurations
This section includes recommendations to follow when configuring and using the U30-based flow.
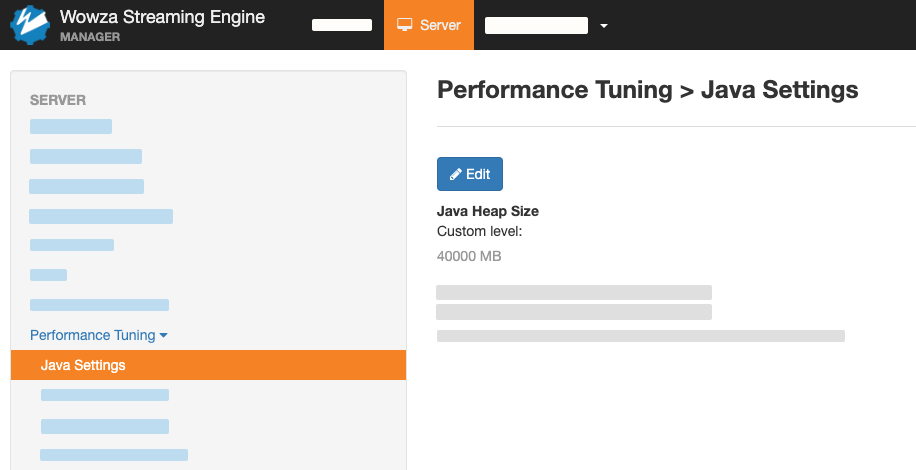
- In Server settings, set the Java Heap Size memory between 40 GB and 60 GB:

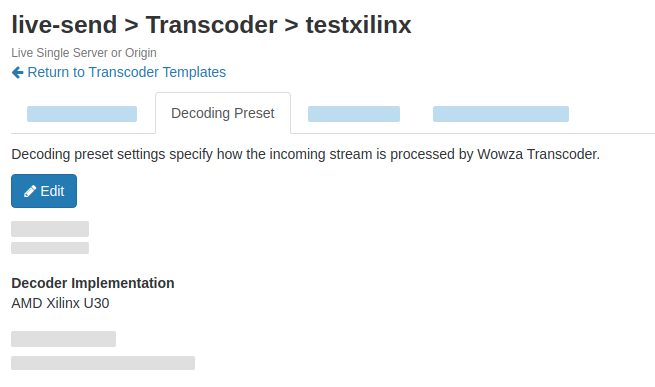
- When configuring a transcoding template for usage with a U30 card, select the AMD Xilinx U30 implementation for the decoder, scaler, and encoder. For example, to use a U30 decoder, use this default decoder implementation.

- The U30 card supports progressive H.264 and H.265 input streams. When working with an interlaced input video stream, select the Default decoder implementation instead of the AMD Xilinx U30 implementation.
Note: Usage of the Default decoder implementation requires you to select the Default scaler as well.
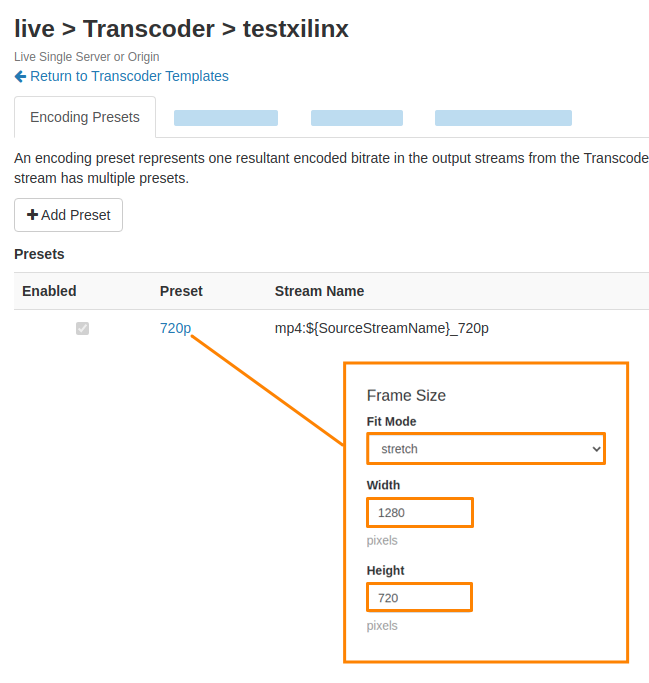
- The adaptive bitrate (ABR) scaler supports resolutions from 128x128 to 3840x2160 in multiples of four. When configuring encoding presets, we strongly recommend you specify both Width and Height resolution values. Also, we recommend you select stretch for Fit Mode.
However, If you select the fit-height or fit-width mode, width or height values are automatically adjusted to be divisible by four.

- ABR ladder for 4Kp60 input streams is supported if 4Kp60 output is not included in the outputs. For example, 4Kp60 → 1080p60, 720p60, 480p30, 240p30.
- ABR ladders for 4Kp30 input streams are supported.
Advanced parameter configurations
Configure profile level propagation
With version Wowza Streaming Engine version 4.8.24, the profile level for the U30 encoder is automatically set depending on output settings, such as bitrate, resolution, and codec. You can also configure the profile level from the transcoder template. To start modifying video parameters in your transcoder templates, see Logging available video encoding parameters and Configuring video encoding parameters.
A section of the profile-level data logged in the wowzastreamingengine_access.log file may look like this:
{"level", "LONG", "unsigned int", "level: Level of encoder multiplied per ten: 10: Level 1, 11: Level 1.1, ..., 52: Level 5.2"}
You can use this information to adjust the transcoded video output with the available video encoding parameters that are logged. The parameter sets the profile level of the encoder and multiplies it by ten. For example, a value of 10 sets the level to 1.0, and a value of 11 sets the level to 1.1. The profile level reverts to the default behavior if a set value doesn't exist.
To change the profile being used, add the following <Parameter> section to the <Video>/<Parameters> container in the <Encode> block of your template:
<Parameter>
  <Name>xilinx-h26x.level</Name>
  <Value>51</Value>
  <Type>Long</Type>
</Parameter>
Enable fallback to CPU transcoding
When the workload exceeds the capacity of the U30 card's resources, the default configuration automatically shuts down overflowing streams. However, you can configure a parameter to fall back to CPU (MainConcept) transcoding in this case. This gives you the flexibility to decide if the CPU should handle the workflow or if it should be restricted to what the U30 card can handle.
To change this setting, add the following <Parameter> section to the <Video>/<Parameters> container in the <Decode> block of your template:
<Decode>
  <Video>
    <Parameters>
      <Parameter>
        <Name>u30.enable_cpu_fallback</Name>
        <Value>true</Value>
        <Type>Boolean</Type>
      </Parameter>
    <Parameters>
  </Video>
</Decode>
Allocate resources to use WebRTC with U30
In your templates, you can add parameters to set maximum and minimum resolutions and maximum frame rates for WebRTC inputs. Wowza Streaming Engine allocates resources based on this input size. If these parameters are not set, the allocation defaults to a reserve for 1080p30 input.
For these settings, add the following <Parameter> sections to the <Video>/<Parameters> container in the <Decode> block of your template:
<Decode>
  <Video>
    <Parameters>
      <Parameter>
        <Name>u30.max_height_webrtc_input</Name>
        <Value>1080</Value>
        <Type>Long</Type>
      </Parameter>
      <Parameter>
        <Name>u30.max_width_webrtc_input</Name>
        <Value>1920</Value>
        <Type>Long</Type>
      </Parameter>
      <Parameter>
        <Name>u30.max_webrtc_framerate</Name>
        <Value>30</Value>
        <Type>Long</Type>
      </Parameter>
    </Parameters>
  </Video>
</Decode>
Example templates for U30-based configurations
In this section, you can find sample templates to use for various AMD U30-based configurations.Transcoding: 1080p60 → 1080p60
<?xml version="1.0" encoding="UTF-8"?>
<Root>
    <Transcode>
        <Description></Description>
        <Decode>
            <Video>
                <Implementation>u30</Implementation>
                <Deinterlace>false</Deinterlace>
            </Video>
        </Decode>
        <Scale>
            <Implementation>u30</Implementation>
        </Scale>
        <Encodes>
            <Encode>
                <Name>1080p60</Name>
                <Enable>true</Enable>
                <Description></Description>
                <StreamName>1080p60</StreamName>
                <Video>
                    <Codec>H.264</Codec>
                    <Implementation>u30</Implementation>
                    <GPUID>-1</GPUID>
                    <Profile>high</Profile>
                    <Bitrate>6000000</Bitrate>
                    <KeyFrameInterval>
                        <FollowSource>false</FollowSource>
                        <Interval>60</Interval>
                    </KeyFrameInterval>
                    <FrameSize>
                        <FitMode>stretch</FitMode>
                        <Width>1920</Width>
                        <Height>1080</Height>
                        <Crop>0,0,0,0</Crop>
                        <SourceRectangle></SourceRectangle>
                    </FrameSize>
                </Video>
                <Audio>
                    <Codec>PassThru</Codec>
                    <Bitrate>${SourceAudioBitrate}</Bitrate>
                </Audio>
            </Encode>
        </Encodes>
    </Transcode>
</Root>
Transcoding with scaling: 1080p30 → 1080p30,720p30,480p30,240p30
<?xml version="1.0" encoding="UTF-8"?>
<Root>
    <Transcode>
        <Description></Description>
        <Decode>
            <Video>
                <Implementation>u30</Implementation>
                <Deinterlace>false</Deinterlace>
            </Video>
        </Decode>
        <Scale>
            <Implementation>u30</Implementation>
        </Scale>
        <Encodes>
            <Encode>
                <Name>1080p30</Name>
                <Enable>true</Enable>
                <Description></Description>
                <StreamName>1080p30</StreamName>
                <Video>
                    <Codec>H.264</Codec>
                    <Implementation>u30</Implementation>
                    <GPUID>-1</GPUID>
                    <Profile>high</Profile>
                    <Bitrate>6000000</Bitrate>
                    <KeyFrameInterval>
                        <FollowSource>false</FollowSource>
                        <Interval>60</Interval>
                    </KeyFrameInterval>
                    <FrameSize>
                        <FitMode>stretch</FitMode>
                        <Width>1920</Width>
                        <Height>1080</Height>
                        <Crop>0,0,0,0</Crop>
                        <SourceRectangle></SourceRectangle>
                    </FrameSize>
                </Video>
                <Audio>
                    <Codec>PassThru</Codec>
                    <Bitrate>${SourceAudioBitrate}</Bitrate>
                </Audio>
            </Encode>
            <Encode>
                <Name>720p30</Name>
                <Enable>true</Enable>
                <Description></Description>
                <StreamName>720p30</StreamName>
                <Video>
                    <Codec>H.264</Codec>
                    <Implementation>u30</Implementation>
                    <GPUID>-1</GPUID>
                    <Profile>high</Profile>
                    <Bitrate>3000000</Bitrate>
                    <KeyFrameInterval>
                        <FollowSource>false</FollowSource>
                        <Interval>60</Interval>
                    </KeyFrameInterval>
                    <FrameSize>
                        <FitMode>stretch</FitMode>
                        <Width>1280</Width>
                        <Height>720</Height>
                        <Crop>0,0,0,0</Crop>
                        <SourceRectangle></SourceRectangle>
                    </FrameSize>
                </Video>
                <Audio>
                    <Codec>PassThru</Codec>
                    <Bitrate>${SourceAudioBitrate}</Bitrate>
                </Audio>
            </Encode>
            <Encode>
                <Name>480p30</Name>
                <Enable>true</Enable>
                <Description></Description>
                <StreamName>480p30</StreamName>
                <Video>
                    <Codec>H.264</Codec>
                    <Implementation>u30</Implementation>
                    <GPUID>-1</GPUID>
                    <Profile>high</Profile>
                    <Bitrate>2500000</Bitrate>
                    <KeyFrameInterval>
                        <FollowSource>false</FollowSource>
                        <Interval>60</Interval>
                    </KeyFrameInterval>
                    <FrameSize>
                        <FitMode>stretch</FitMode>
                        <Width>848</Width>
                        <Height>480</Height>
                        <Crop>0,0,0,0</Crop>
                        <SourceRectangle></SourceRectangle>
                    </FrameSize>
                </Video>
                <Audio>
                    <Codec>PassThru</Codec>
                    <Bitrate>${SourceAudioBitrate}</Bitrate>
                </Audio>
            </Encode>
            <Encode>
                <Name>240p30</Name>
                <Enable>true</Enable>
                <Description></Description>
                <StreamName>240p30</StreamName>
                <Video>
                    <Codec>H.264</Codec>
                    <Implementation>u30</Implementation>
                    <GPUID>-1</GPUID>
                    <Profile>high</Profile>
                    <Bitrate>625000</Bitrate>
                    <KeyFrameInterval>
                        <FollowSource>false</FollowSource>
                        <Interval>60</Interval>
                    </KeyFrameInterval>
                    <FrameSize>
                        <FitMode>stretch</FitMode>
                        <Width>432</Width>
                        <Height>240</Height>
                        <Crop>0,0,0,0</Crop>
                        <SourceRectangle></SourceRectangle>
                    </FrameSize>
                </Video>
                <Audio>
                    <Codec>PassThru</Codec>
                    <Bitrate>${SourceAudioBitrate}</Bitrate>
                </Audio>
            </Encode>
        </Encodes>
    </Transcode>
</Root>


