

The 7 Best Hardware Encoders for Live Streaming (Update)

If you have questions about what to look for in a hardware encoder, this article will walk you through the right things to look for before buying one. I’ll also identify some of the best hardware encoders in multiple categories. For transparency’s sake, I haven’t been hands-on with all these encoders personally and have chosen several of them based on features, specifications, and user reviews.
Let’s start by looking at what an encoder is, what it does, and why hardware encoding is often preferable over software encoding.
Table of contents
What Is an Encoder and Why Is Hardware Better?
An encoder is a device or program that inputs a video signal and outputs either a compressed stream for delivery to a cloud service for transcoding or a complete encoding ladder ready for direct delivery to viewers. I’ll cover only the former category in this blog post, not the latter.
Most software-based video mixers, from OBS to the TriCaster, have integrated encoding capabilities, which are always an option for encoding and delivering a stream to the cloud service. However, because encoding is a CPU-intensive process that can steal CPU cycles from these programs (and potentially degrade performance or stability), many producers eschew using an integrated encoder for a separate hardware encoder.
Before digging deeper, let’s distinguish encoders from capture devices. It’s easy to confuse the two because many encoders and capture devices may look similar and come from the same manufacturer. However, capture products typically connect your video source to a computer, usually via USB, so you can input your video into a video mixing application like OBS or Wirecast. In contrast, encoders directly input video from a camera or camcorder, encode it into a compressed format, connect to your cloud service, and deliver the stream to the internet for transcoding.
Like most technical products, identifying the best encoder for a particular application starts with a number of questions.
Can it connect to my audio/video source(s)?
The major differentiators here are connection types (HDMI vs. SDI), resolution, and frame rate (1080p/4K, 30/60 fps). Most inexpensive encoders input HDMI, so if you’d prefer to work with SDI and your camcorder supports it, you may have to spend a bit more.
Also, consider the number of connections, particularly in the context of a broadcast application or lecture capture, where the output signal might combine multiple sources like PowerPoint input from a laptop with a talking head video. In this case, you’ll need a capture device with multiple inputs, and these mixing capabilities.
If you’ll be inputting audio from a source other than HDMI or SDI, say from an audio mixer or separate set of microphones, be sure the encoder supports the number of audio connectors needed and the device types as well.
If your live streaming setup involves multiple inputs from different sources, you should sketch out the number and type of connections needed before you purchase your encoder. That way, you can make sure you buy an encoder that supports your production, and the necessary cables and other connectors as well.
Can it produce my target output?
Virtually all encoders can produce 1080p@30 fps 8-bit output with the H.264 codec. If high frame rate, HEVC, high dynamic range (HDR), and/or 4K/8K are currently required or in your future, you may need a more capable encoder. If you’re not sure, check the specs of the cloud service you’ll deliver your streams to ensure that your encoder can supply a properly formatted stream.
If you’re streaming 1080p/30 video with good connectivity, typically H.264 encoding will work just fine. If you’re exploring 4K video, particularly over less stable connectors like cellular, it may make sense to experiment with HEVC if your service can input it because it can deliver a higher quality stream than H.264 at a lower bitrate. AV1 at this point is still pretty exotic; not all services support AV1 live input and not many live streaming applications require the additional efficiency AV1 might deliver.
Will it connect to my target service?
Similarly, all transcoding and delivery services publish specifications that detail the protocols, container formats, codecs, and other information about the streams that they ingest. Here are the specifications for Wowza Streaming Engine. Some services are relatively generic; with H.264 and RTMP the primary flavors available. All encoders should be able to connect to these services without issue.
Support for more exotic fare, like SRT support for low latency and/or HEVC support for low bandwidth streams, is less available — though rest easy, Wowza Streaming Engine supports both. To access these features, you’ll need a more professional (and expensive) encoder.
How do I control it?
By control, I mean connecting to the service, configuring the stream(s), and starting and stopping the streams. You control most encoders by logging in from a computer on the same LAN, or via a smartphone app. Either schema should work well for most typical productions when the person in charge of the encoding is proximate to the encoder.
You can connect to some encoders via a computer to configure the encoder with driver software. Once you have the cloud service connected and the stream configured, the encoder will save this data so you can control the unit on location via simple buttons on the unit.
Still other products offer a cloud interface that lets anyone with cloud access control the device. This would be useful if your encoding expert isn’t onsite. Once you understand how and where you’ll staff your productions, make sure your encoder lets you control operation as required by the schema.
How will it connect to the internet?
Virtually all encoders have Ethernet ports, Wi-Fi capabilities, or both. If neither of these are available at your production location, you’ll need an encoder that can connect to the Internet via cellular. I discuss several options with this capability below.
How noisy is it?
If you’re running the encoder in a remote, obviously you don’t care about this. On the other hand, if the talent and production team are in a closed space, encoders without noisy fans are definitely best.
With these questions in mind, let’s start exploring different encoder classes for different applications.
General Purpose Encoding
For general purpose streaming from a fixed location with power and internet, you can focus on cost and simplicity.
1) URayCoder H.265 H.264 HD HDMI Video Encoder
One unit that ticks all the right boxes (and provides a great diagram to assist our discussion) is the HDMI Video Streaming Encoding with HDMI Loop Out, which boasts a 4.6-star average rating on Amazon with 133 ratings ($229). This unit accepts HDMI input at 1080p maximum, along with line-in audio via the 3.5mm jack on the front panel, and outputs both H.265 and H.264.
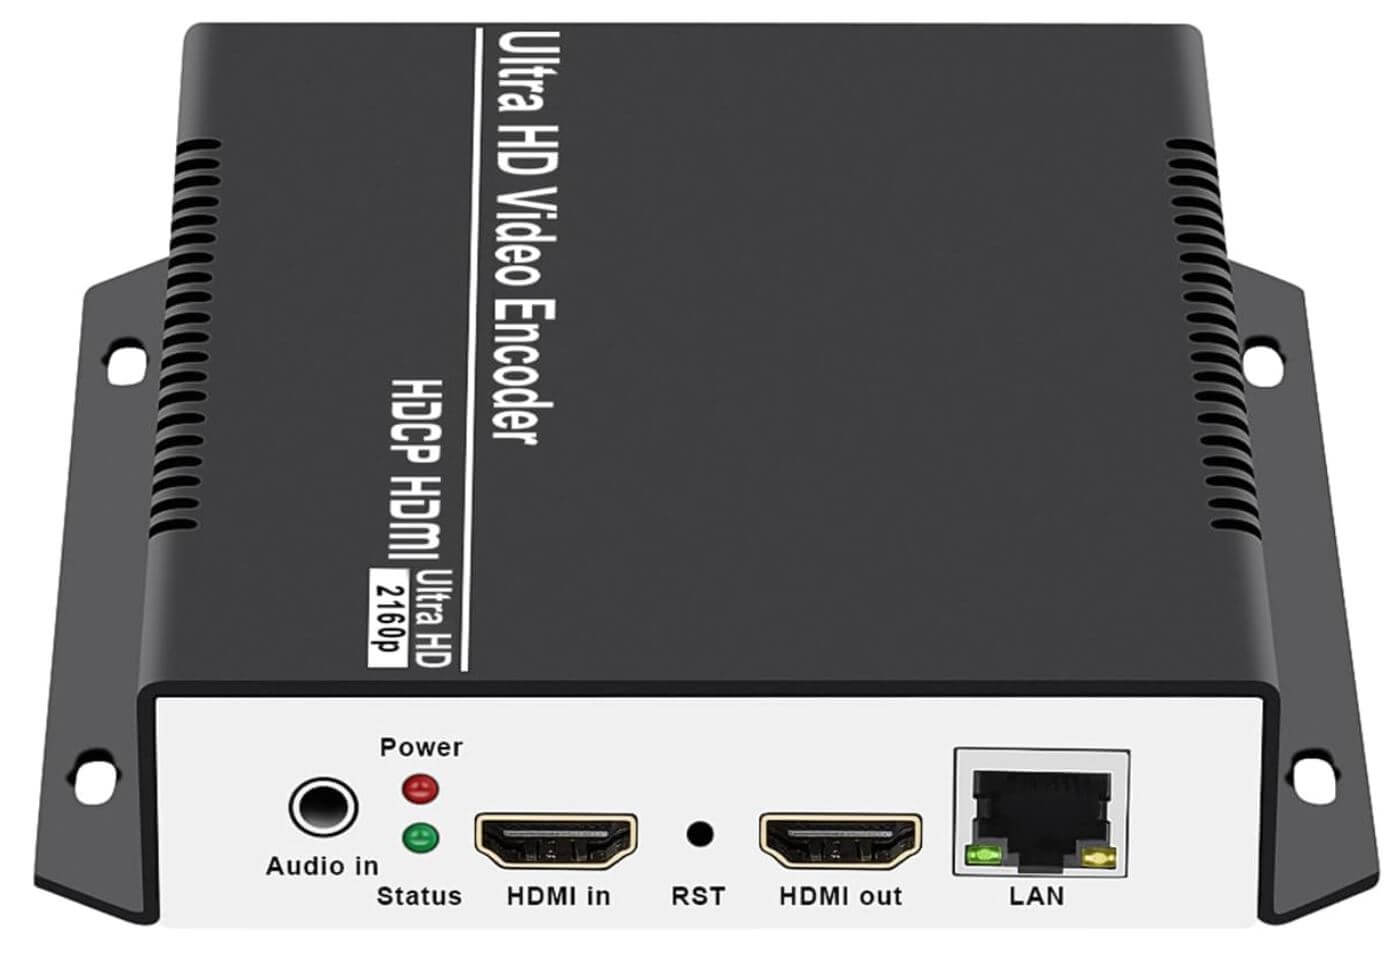
The HDMI out shown on the right of the unit is called a passthrough, allowing you to attach an HDMI monitor that displays the HDMI input. This provides a nice confidence monitoring function (yes, the unit is receiving video) and could be useful for some presentations or events.
In the diagram below, you see the basic operational schema. The unit accepts HDMI input from camcorders or other devices, encodes on board, then sends the signal out via an Ethernet connection to up to four streaming services, though you’ll need 4x the outbound bandwidth to do this. You control operation via a web page or smartphone, as shown on the lower right.
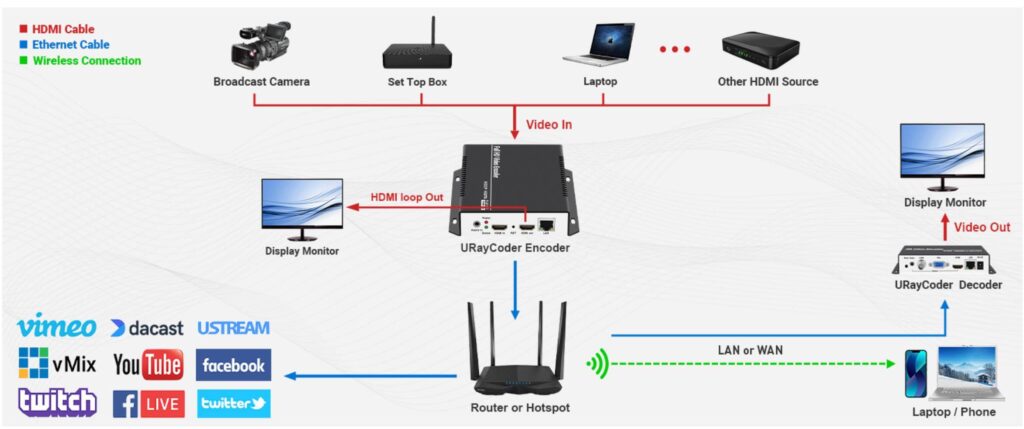
As you see in the diagram, you can also display the video from a separate decoder box, which is convenient for sharing presentations in remote locations. For those seeking slightly different functionality, URayCoder also has other relatively low-cost units that accept SDI input ($249) and output only H.264 ($169).
2) Datavideo NVS-35
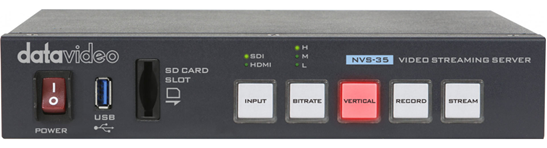
It’s often useful during a live event to record the output locally, so you can immediately make the stream available for VOD viewing or grab highlights. In these instances, you might have to stream at relatively low quality — say 4 Mbps for a 1080p stream — but record at a higher bitrate, like 12 Mbps, for better quality. The DataVideo NVS-35 shown below ($999.69 at B&H, no reviews) supports onboard recording via an SD card slot on the front, and you can configure both streams to different quality levels.
The unit has A/V inputs for HDMI and SDI, with 2 XLR inputs plus RCA connectors for other audio sources. he unit supports FAT32 (with its 4GB file size limit), exFAT, and NTFS file systems, enabling recordings with no practical file size limits for most applications, and features dual-stream output so you can stream to two services simultaneously, or record to the SD card and stream to a service simultaneously.
3) Install an NVIDIA (or similar) GPU in your mixing PC.
Beyond these options, consider thinking inside the box. Specifically, if you’re configuring a computer for a software-based video mixer like OBS, vMix, or Wirecast, you can add hardware encoding via many NVIDIA-based graphics cards (see a list here).
Most current NVIDIA GPUs support at least H.264, and you can choose GPU-based transcoding via the video encoder configuration in the software. The figure below shows OBS from NVIDIA’s newly updated guide here, but the same techniques should apply to other similar programs.
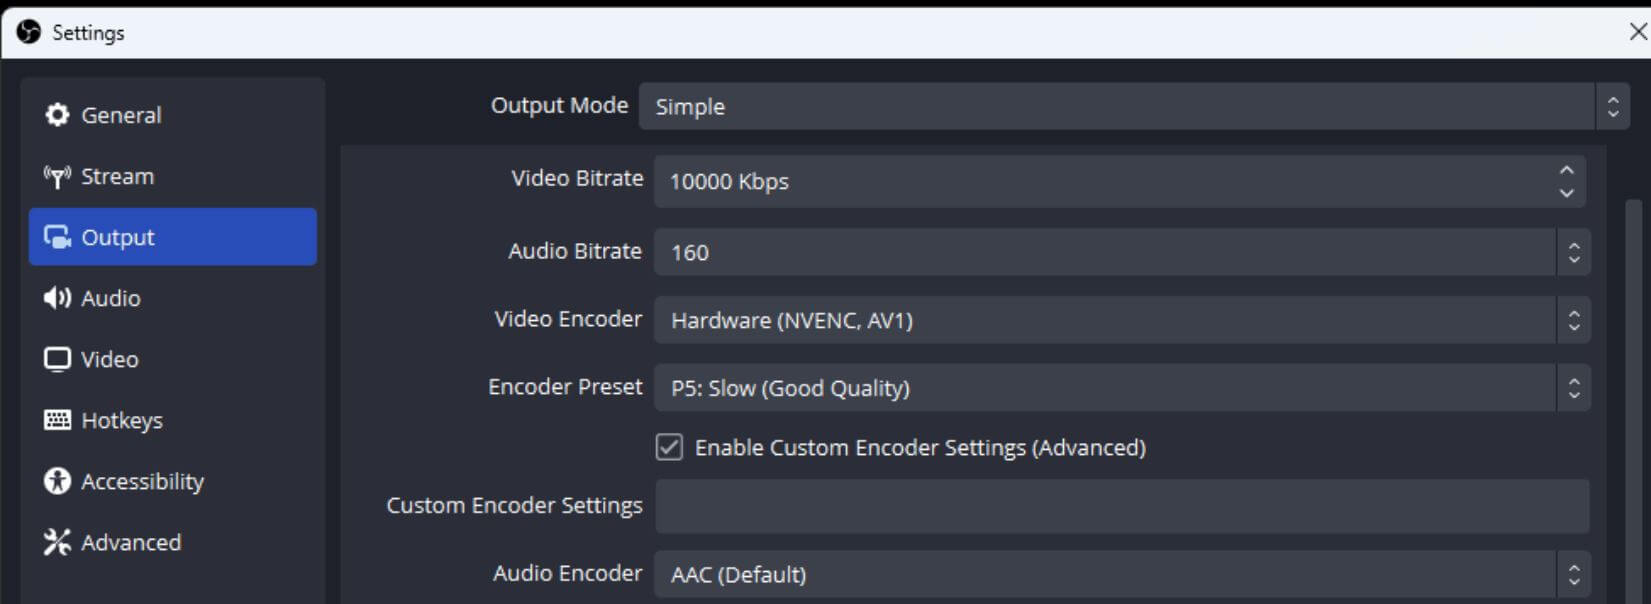
Once configured, the GPU will manage all the transcoding, freeing up the host CPU for mixing and other production tasks. You might already have this capability if you’re producing your event on a workstation or notebook with a GPU. Check your output settings, and if an output mentions NVENC (NVIDIA), QuickSync (Intel) or something similar, you probably can already access GPU or CPU assisted transcoding.
I specify NVIDIA as opposed to AMD or Intel because, in my experience, NIVIDIA offers many more options, does a better job with documentation, and delivers equal or better quality to the other hardware options. If you have another graphics card, try it, but if you’re buying new for this encoding, go with NVIDIA.
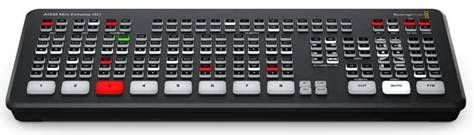
4) ATEM Mini Pro
Another way to look inward to access hardware-based H.264 encoding is via switchers like the ATEM Mini Pro below, which has integrated encoding functionality ($295, 4.7 out of 5 stars on Amazon with 1,695 ratings). Many low-end switcher appliances don’t offer hardware encoding and require either an external encoder that input an HDMI or SDI output from the appliance or a computer that can input a USB output from the switcher.
While you’ll usually need a computer to drive the ATEM Mini Pro during your event, you won’t need a separate encoder; just plug an Ethernet cable into the Mini, and you can encode with hardware and stream directly to your target service. This is a unit that I own, and it’s worked well in many productions.
Portable Devices for Remote Production
When you don’t have Ethernet or Wi-Fi, you’ll need a cellular connection to get the encoded stream to the Internet. This requires an encoder that combines compression and cellular communications.
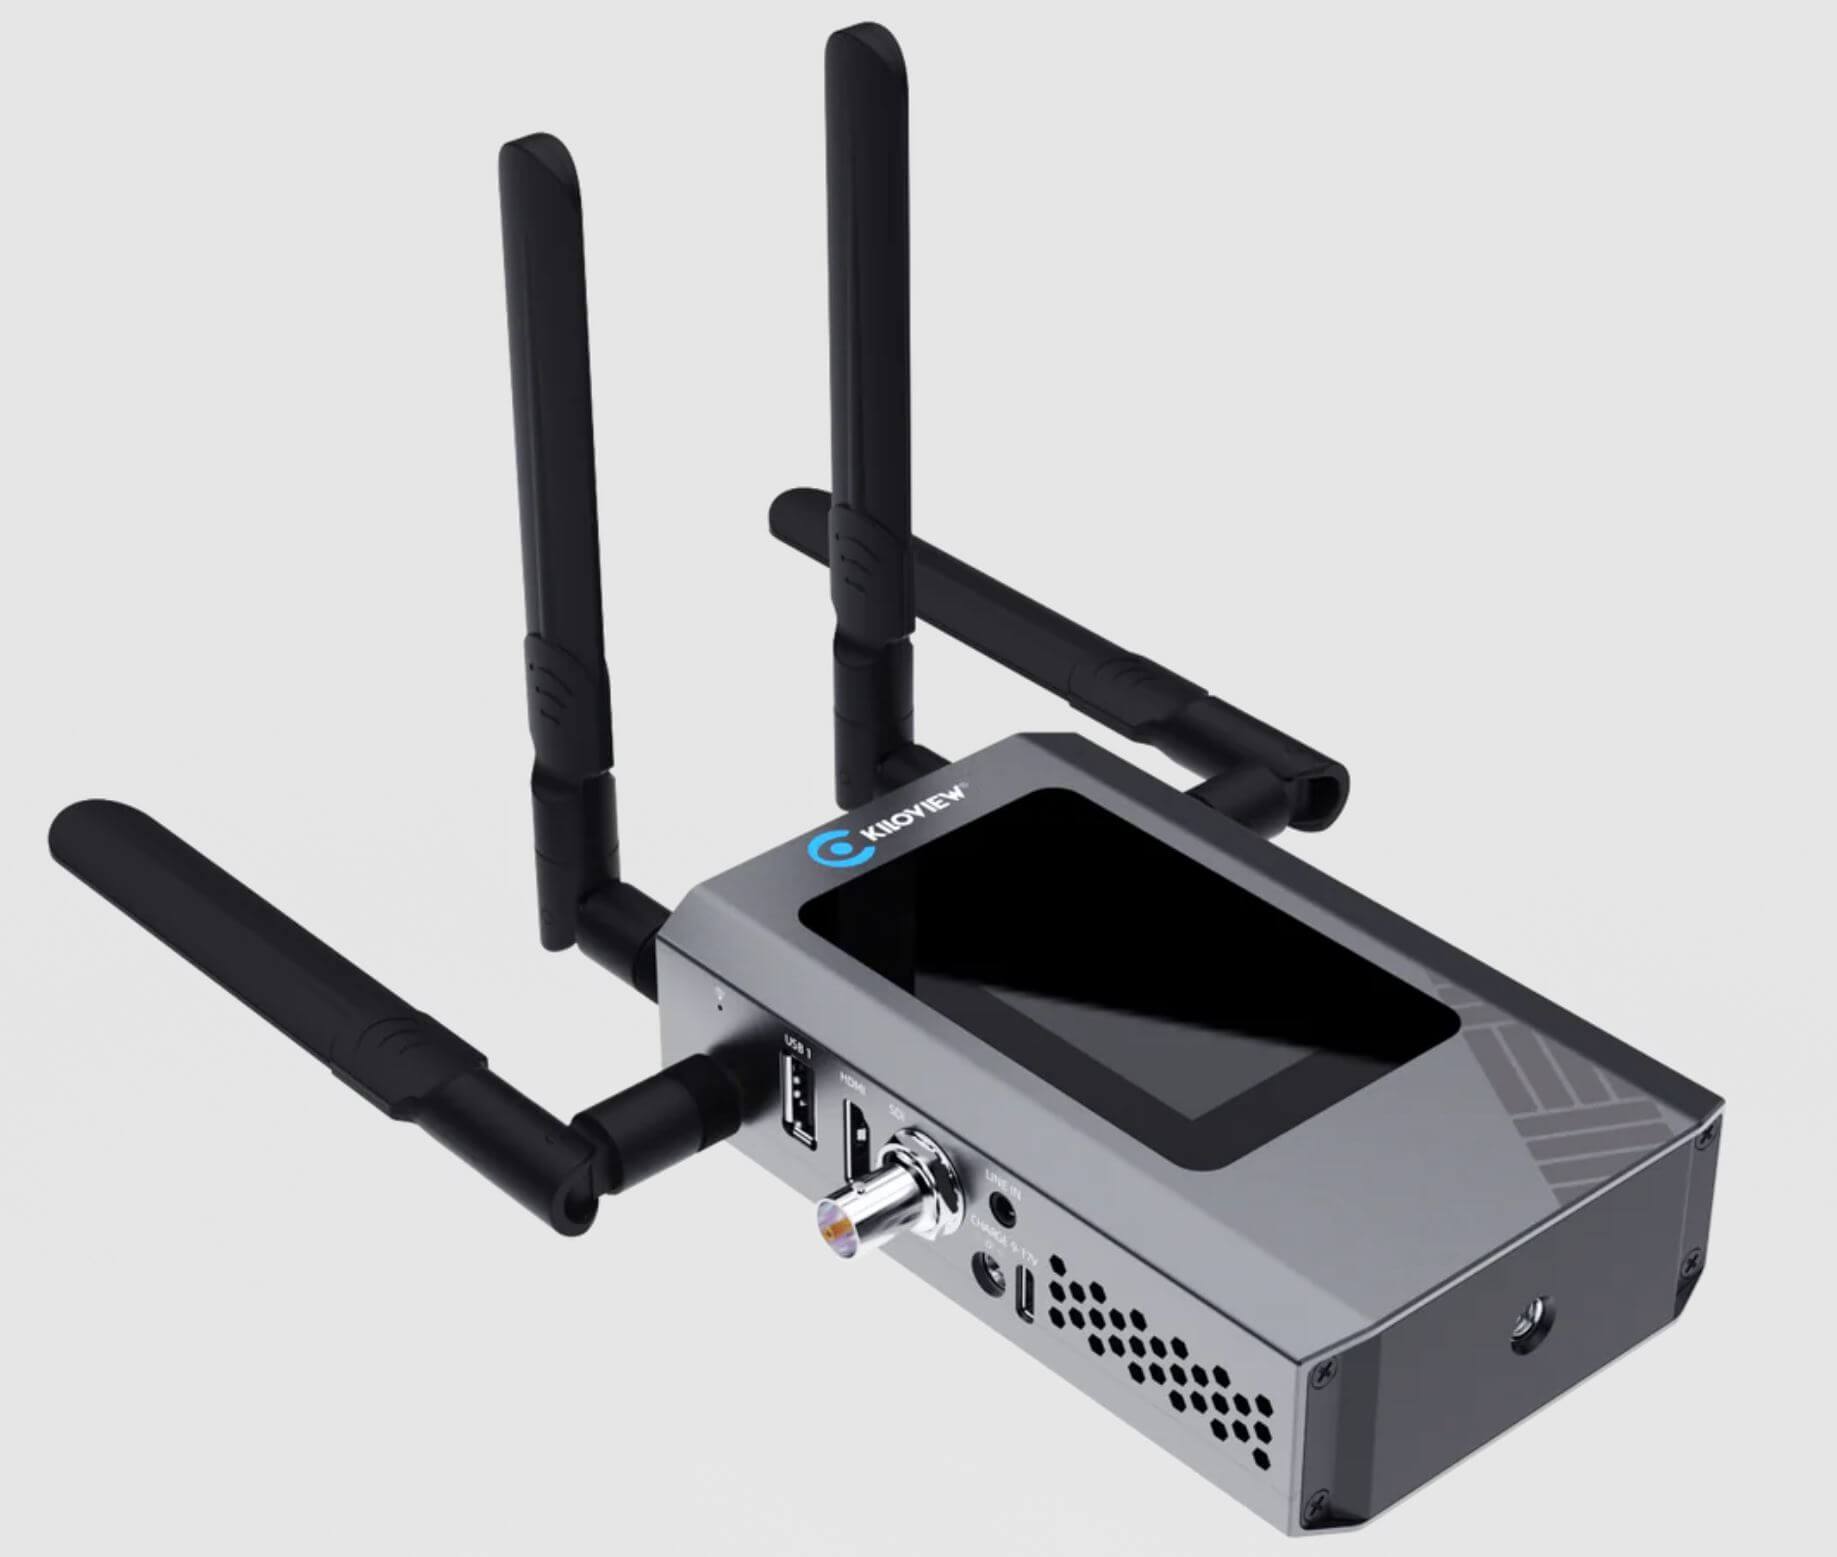
5) The Kiloview P3 Mini ($1,199 B&H, no reviews)
Units offering this encoding/cellular combination typically come in two general form factors, units that sit on your camera, like the Kiloview P3 Mini below, and bigger units with extended batteries that come in bags or backpacks.
The P3 Mini uses what’s called cellular bonding to combine up to three 4G cellular connections, plus Wi-Fi (2.4GHz and 5GHz) and Ethernet, through Kiloview’s KiloLink technology. This bonding provides both redundancy (if Verizon doesn’t have a tower, T-Mobile probably does, and the bondng technology will prioritize T-Mobile) and the ability to distribute your encoded video over the collective bandwidth of all the connections.
Note that if you deploy cellular bonding, you’ll have to deliver streams to your target service by going through KiloLink’s cloud service. That’s because bonding is proprietary to each service provider, so Wowza, YouTube, or Facebook won’t know how to reconstitute the video stream from the multiple disparate signals. These cloud services are generally transparent to the user and enable features like distributing your signal to multiple services simultaneously and cloud recording.
On the other hand, if you’re only using a single 4G connection, you can go directly to your target service, as you can when using Wi-Fi or Ethernet.
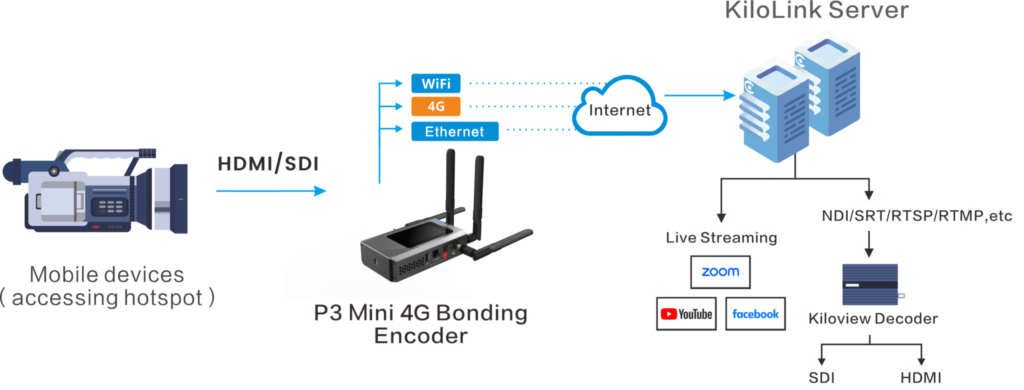
If you use bonding, you’ll access your target services via KiloLink.
You configure the Mini via a web interface. Connect the Mini to a network via the Ethernet connector, attach your computer to the same network, and you can access the Mini’s controls using a web browser.
The P3 Mini supports both HDMI and 3G-SDI inputs and outputs H.264 and HEVC up to 1080p60, which is also the maximum input configuration. There’s an onboard 3-inch touchscreen LCD for monitoring and control. Dual USB ports allow for keyboard or PTZ camera control, and for recording your live stream to a USB drive for backup or offline access. The P3 Mini is powered by a 5000mAh battery with PD fast charging.
Though 5G is a more capable connection, the choice of 4G for the P3 Mini is a pragmatic one for widespread mobile use. 4G LTE networks offer widespread coverage and reliable performance, making them a strong choice for mobile streaming. For many common streaming resolutions and bitrates, a bonded 4G connection provides sufficient bandwidth and stability for professional-quality live streams.
6) LiveU
While on-camera devices are ideal for run-and-gun news gathering, they may offer limited battery life and 4G rather than 5G connectivity. If either of these is an issue for you, and an on-camera form factor isn’t required, consider the LiveU Solo PRO, a brick-sized bonding encoder that comes in two configurations, HDMI (B&H, 3.5 stars with 5 reviews, $1,495) and HDMI/SDI (B&H, 3.5 stars with 5 reviews, $2,195). Both units offer up to six network connections: four external 4G/5G modems (connected via optional Y-cables or bundled-in kits), plus Wi-Fi and Ethernet. This combination can support up to 20Mbps for a stable stream.
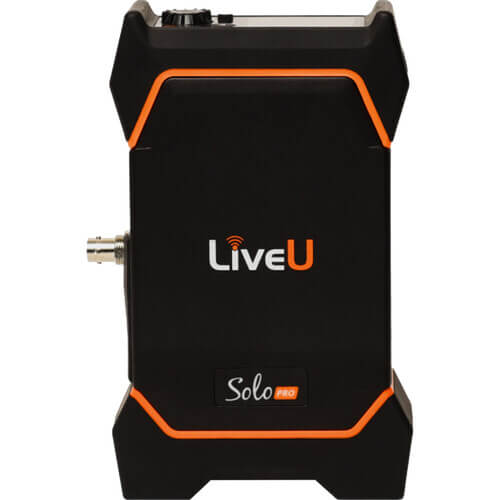
The Solo PRO inputs up to 4K60p and can output the same in both HEVC (H.265) and H.264 formats. Weighing just over two pounds, you can carry the Solo in a shoulder or belt pack. An internal battery provides up to three hours of operation and you can power the unit via USB-C.
You control the LiveU Solo PRO through both a local 2.2” display with a jog wheel or a web-based remote-control interface accessible from smartphones, laptops, or tablets. The display provides real-time monitoring of network connectivity and throughput. The Solo PRO includes two USB 2.0 ports, an RJ-45 Ethernet port, and the USB-C power input.
For bonding, the Solo uses LiveU’s Reliable Transport (LRT) protocol. As with the P3 Mini, while the Solo PRO can stream directly to platforms like Facebook, YouTube, Twitch, and Wowza via RTMP/RTMPS when using a single connection, using bonded cellular connections requires leveraging LRT and LiveU’s Solo Portal.
Lecture Capture and Presentation Solutions
Lecture capture and presentation systems are used to broadcast classes, webinars, presentations, or similar live events and combine mixing, mixing, recording, and live-streaming output.
7) Epiphan Pearl Nano (3.8 stars in 6 ratings on Amazon, $1,999)
The Epiphan Pearl Nano is a portable H.264/H.265 encoder, about the size of a thick paperback, designed for streaming and recording. The front panel contains an almost 2″ diagonal LCD panel, some onboard controls, an SD card slot for recording, and a headphone jack.
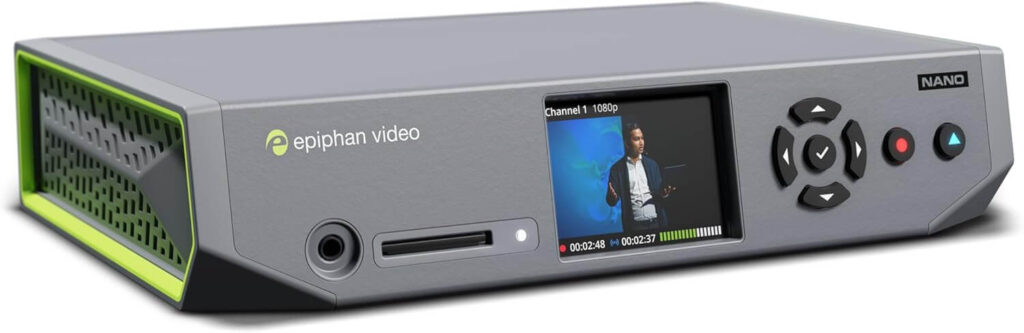
On the back are connectors for 12G SDI and 4K HDMI 4K60p input that the unit can combine signals into a polished presentation. Nano also supports video input over Ethernet using RTSP and SRT protocols and provides two HDMI outputs, a passthrough port for viewing your HDMI input, and a program out for viewing the integrated presentation. In addition to audio embedded in the SDI/HDMI inputs, the Nano offers two XLR inputs and one RCA stereo input and can accept audio via USB and network streams (RTSP/SRT).
You control the Nano via its web-based interface, which you access by connecting the Nano to your network and navigating to its IP address (displayed on the unit’s LCD) in a web browser. From this interface, you configure layouts, encoding settings, and streaming destinations.
You can combine multiple inputs into a composite view to create a picture-in-picture effect and save these configurations as presets. Encoding controls are straightforward, and the settings apply to both streaming and recording. It supports both HEVC (H.265) and H.264 encoding.
Conclusion
There you have it — seven of the best hardware encoders on the market. Each have their advantages depending on your production and what kind of streaming you want to do, so consider the pros and cons of each as you make your decision.
FREE TRIAL
Live stream and Video On Demand for the web, apps, and onto any device. Get started in minutes.
- Stream with WebRTC, HLS and MPEG-DASH
- Fully customizable with REST and Java APIs
- Integrate and embed into your apps