Remote Learning During the Coronavirus Outbreak: Stream From Zoom to Thousands

To construct a remote learning classroom in a very short time, Wowza Media Systems offers a simple solution that requires zero developer or video experience. Using the Zoom Meeting platform and a Wowza Streaming Cloud license, one instructor can host and deploy a live, virtual classroom to hundreds or thousands of viewers in just ten minutes.
If you’re not familiar with Zoom, it’s an easy-to-use video conference tool that allows people to virtually connect from any location and participate in a class, meeting, or work session. One person can easily host an online classroom, and Zoom offers valuable features such as screen share for teachers who need to display an on-screen presentation to their students.
Enhanced Zoom Security
Zoom recently released several new security settings that are easy to implement before you even begin your Zoom broadcast. These enhancements, along with Wowza Streaming Cloud’s ability to encrypt your live video, will protect your streams from uninvited guests by keeping them private and secure. We’ll discuss these new Zoom security settings in more detail below.
Tutorial Agenda
In this article, I’ll describe how to create and share a virtual Zoom classroom using Wowza Streaming Cloud and a simple RTMP URL. There’s no need for the participants in the virtual class to each download and configure a Zoom account. Rather, the instructor leading the class would create a live stream in a Zoom meeting and then share the stream link with students. For students opening the URL, a player will launch in Wowza Streaming Cloud, connecting them to a virtual classroom.
For those institutions that have a security requirement to embed the live stream in a private course platform, Wowza has a simple way for you to copy and paste the embed code into your own HTML. We will demonstrate how you can do this in the tutorial below.
Step 1: Get Started
Creating a new stream:
1. Go to cloud.wowza.com.
2. Sign in with your credentials provided upon license purchase.
3. Click the Live Streams menu and then click Add Live Stream.

4. Enter a Live Stream Name (it can be anything you’d like), click on the Broadcast Location closest to you, and then click Next.
5. On the Video Source and Transcoder Settings page, select OTHER RTMP.

6. Leave all other settings as the default except for Source Security. Here you want to Disable Authentication, so make sure that you put a checkmark in that box, then click Next.

7. On the Playback Settings page, leave all default settings as they are and just click Next at bottom of the page.
8. On the Hosted Page Settings page, if you’d like Wowza to provide a hosted web page for your video stream, click Yes. You can name it if you’d like, add a description, or even add a thumbnail image prior to start of stream. When finished, click Next.
9. On the final page, Review Settings, simply click Finish at the bottom of page.
Congrats! You are now ready to start your live stream! But, don’t click Start Stream just yet.
Step 2: Create a New Zoom Meeting
Configuring the settings:
1. Sign into your Zoom account.
2. If your educational institute already has a Zoom account, be sure you are enabled as a host. NOTE: This must be a paid Zoom account, not the free version.
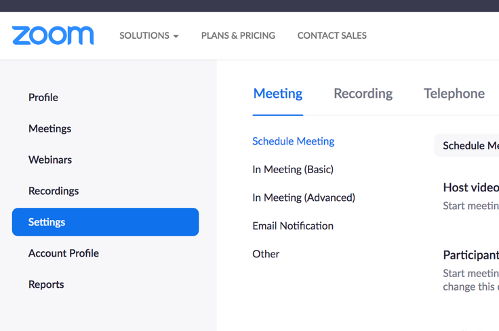
3. In the navigation to the left of the screen, click on Settings.
4. Scroll all the way down the Settings page until you see Allow Live Streaming Meetings. *Tip: If you click on: In Meeting: Advanced, you’ll get there much faster than scrolling.
5. Be sure to click on Custom Live Streaming Service. Enter some directions if you’d like, then click Save.

6. Now, you can go to the top of the page to the nav and click on Schedule a Meeting. Enter the meeting description info and click Save.
Step 3: Advanced Security Settings
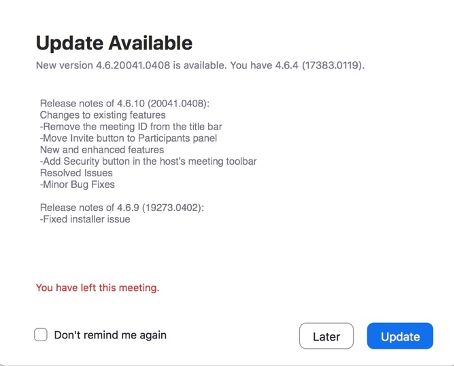
Zoom now offers advanced security settings, but to access them in your admin dashboard, you’ll need to be using the most recent version. When you open up Zoom and see the below popup, be sure to click Update.

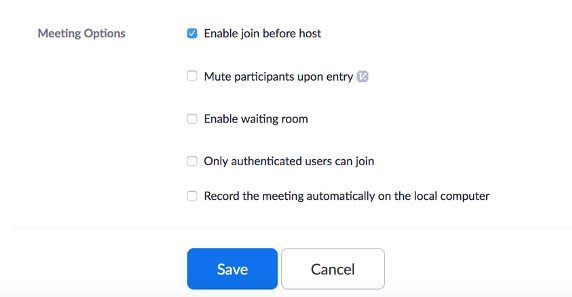
You can edit the security settings for all meetings or for an individual Zoom Meeting
Here is how to configure security for all Zoom meetings:
Click Settings in the left navigation pane. Scroll down the page and turn on the security options you’d like to have. This will apply to all future meetings, but you can always go back in adjust them.

To configure security for an individual Zoom meeting:
Click Meetings in the left navigation pane. Scroll down to the bottom of the page, enable the security options you’d like, and click Save.

Wowza suggests the following security settings be enabled for all Zoom streams:
Require Passwords
The simplest and most effective way to secure a meeting is to enforce a password. This is automatically enabled by default when you have the most recent version of Zoom. The password will automatically be appended to the end of the Zoom link when the host creates the meeting. Your invitees simply click the URL link to join and do not need to know the password.
Enable the Waiting Room
The Waiting Room option is a virtual staging area that prevents people from joining until you click Allow. You will see their name pop up, indicating that they would like to enter the meeting. With this setting, you have the visual ability to see who is trying to join. You can decide to allow or not.
Disable Renaming Participants
Zoom participants normally have the option to rename themselves, but we encourage you to disable the feature. If the name of a person trying to enter your meeting appears and it is not a name on your list of attendees or is simply not someone you’d like to admit, you have additional control by seeing their real name.
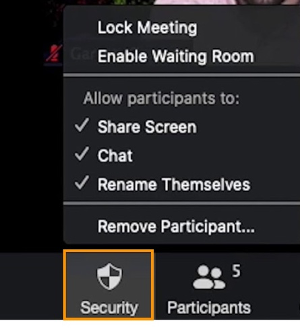
At any time during a Zoom meeting, the host will now have access to the new Security icon at the bottom of the page. When the host clicks on this host, they will now have easy access to several existing Zoom security features that can be used during the meeting.

Several additional security measures are now available to the Zoom host, such as muting attendees, removing guests, locking the meeting from any additional guests, and disabling the ability for guests to share screens.
For more information on the all the new Zoom Security settings, please check out their recent blog.
Step 4: Connect Zoom With Wowza
Sharing the stream information:
1. Once your Zoom call has begun, navigate to the bottom of the Zoom screen and click on More in the bottom right. When you do that, a pop-up will appear. Click on Live on Custom Live Streaming Service. Once clicked, a page with a form will appear.

2. Here, you will need to enter some information and we will get that info directly from Wowza Streaming Cloud.

3. Head back over to Wowza Streaming Cloud and click the green Start Live Stream at the top of the page where we previously left off.

You will see a Streaming Cloud Data Page appear once the stream begins, and we will use some of this information to populate our Zoom form.

Step 4: Complete the Zoom Form:
Starting the stream from Zoom:
1. From your Streaming Cloud Data Page, copy the entire Primary Server line that begins with rtmp://. You can see this highlighted in the example above. NOTE: You do not need to include the IP address number in between the parentheses at the end of the URL.
2. Back in Zoom, paste the RTMP URL into the first line that says Streaming URL. You will get a pop-up saying you have entered a non-encrypted URL. You can ignore that. Cloud security encrypts the stream for playback.
3. For the Stream Key field in Zoom, you will simply copy and paste the Stream Name which is underneath the Primary Server info you copied and pasted above from Connection Settings. The stream key and the stream name are the same thing.
4. Our last step in the Zoom form is to enter the website page or URL where the stream will be playing. In this tutorial, we did choose to have Wowza create a hosted player page. Copy the Hosted Page URL from Cloud and enter it in the Zoom field for Live Streaming Page URL.
5. Once you’ve completed the form, click the blue Go Live button.

Wowza Streaming Cloud will now start to receive the video from Zoom as an RTMP source. Once received, it will process and package the stream for playback across multiple devices. To see the stream, click the Open button next to the Hosted Page URL and this will launch the player.

NOTE: It may take 30 to 45 seconds for the stream to begin as Cloud is still receiving the initial video data chunks from Zoom.
You are now able to share the HTTPS playback link the following ways:
- Paste the link to the Wowza Host page into your course documentation
- Through an HTML5 Player of your choice
- Direct email to those invited to the session
- Embed the Cloud Player code into a webpage
To embed the Cloud Player into your own HTML, you can copy and paste the code underneath the Player Embed Code. To integrate the HLS playback URL into a player, copy the .m3u8 URL provided in Playback URLs.

Note: We recommend recording your streams in Wowza Streaming Cloud to ensure the security of your MP4 recordings and transcoded output. Recordings can then be downloaded and saved locally.
Conclusion: Remote Learning With Wowza
There you have it. Wowza Streaming Cloud can easily be integrated with Zoom to create live virtual classrooms and interactive online courses. For organizations solving for disruptions caused by the coronavirus outbreak, this enables today’s educators to build custom experiences at scale. That’s because the Wowza Streaming Cloud service allows you to distribute HLS streams to large audiences on any device.
For more information on how to obtain a Wowza Streaming Cloud License or how to select which plan is right for you, please contact billing@wowza.com


